
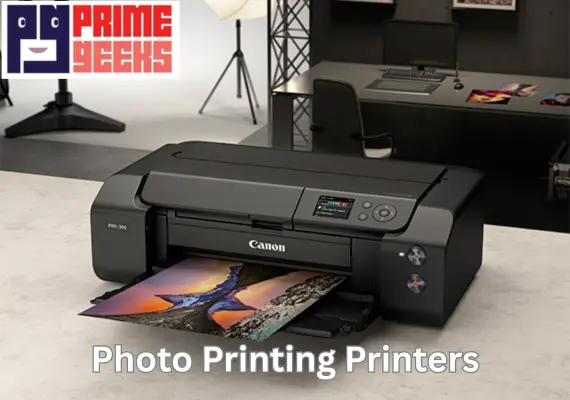
Setting up a printer can feel hard at first, but it becomes easy when you follow clear steps. This guide is written for homes, small studios, and offices around Sydney that want bright, sharp photo prints. Many people buy Photo printing printers without knowing how to install them the right way.
A careful setup protects your device and helps it last longer. This article shares simple advice based on real hands-on experience helping local users. You will learn safe, smart ways to get your printer working perfectly from day one.
Why Proper Setup Matters More Than You Think
A printer that is installed the wrong way can waste ink, print blurry photos, or stop working early. Correct installation helps colors look real and keeps parts from wearing out fast. In Sydney’s busy homes and workplaces, printers often run many hours each week.
Good setup also protects cables, power sources, and network connections. Following expert-backed steps like the ones recommended by Prime Geeks helps people avoid common damage and costly repairs. Think of installation as building a strong base before printing your first photo.
Choosing the Best Spot in Your Home or Office
Pick a flat, strong table that does not shake when the printer runs. Keep it away from direct sunlight, heaters, or damp areas, because heat and moisture can harm ink and parts.
Leave space around the machine so air can move and wires do not bend. If you use Wi-Fi, choose a spot where the signal is strong and steady.
Good placement keeps Photo printing printers working smoothly and reduces connection problems. A tidy area also makes refilling paper and ink easier.
Unboxing and Checking All Printer Parts
Open the box gently and avoid using sharp tools that could scratch cables. Take out each part and check the manual list to make sure nothing is missing. You should see ink cartridges, power cables, setup guides, and sometimes sample paper.
Look for tape or safety clips that protect moving parts during travel. Remove them slowly so nothing breaks. This first check helps your Photo printing printers start life in perfect shape.
Connecting Power and Turning the Printer On
Plug the power cable into the printer first, then into a safe wall socket. Do not use loose extension cords if possible, because stable power keeps electronics safe. Press the power button and wait for the screen or lights to turn on.
Many machines will guide you through language and date settings. Follow each step calmly without rushing. A steady first startup helps Photo printing printers run without errors later.
Installing Ink Cartridges the Right Way
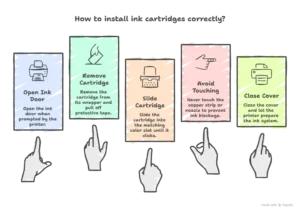
Open the ink door when the printer asks you to. Remove each cartridge from its wrapper and pull off the protective tape. Slide the cartridge into the matching color slot until it clicks.
Never touch the copper strip or nozzle, as oil from fingers can block ink flow. Close the cover and let the printer prepare the ink system. Proper ink setup helps Photo printing printers produce clean and bright images.
How to Connect Photo Printing Printers to Wi-Fi
Most modern printers have a wireless setup option on the screen. Choose your home or office network and enter the password carefully. Stay close to the router during this step to avoid signal drops. Once connected, the printer should show a success message.
A strong connection allows easy printing from laptops, tablets, and phones. This step makes Photo printing printers much more useful for busy Sydney users.
Installing Drivers and Printer Software
Your computer needs special software called drivers to talk to the printer. Insert the setup CD or download the program from the brand’s official support page. Follow each screen step and allow permissions when asked.
Restart your computer if the system requests it. Correct software helps your printer understand photo sizes, colors, and paper types. Experts at Prime Geeks often remind users that skipping this step leads to poor print results.
Adjusting Settings for High-Quality Photo Prints
Open the printer settings on your computer and choose photo or high-quality mode. Select the right paper type, such as glossy or matte photo paper. This tells the printer how much ink to use.
You can also check color balance and border settings before printing. These small changes make a big difference in final photo quality. Well-adjusted Photo printing printers create images that look rich and detailed.
Testing Your Printer with a Sample Image
Before printing important photos, try a test print. Use a colorful picture that shows faces, shadows, and bright areas. Look for lines, faded spots, or strange colors. If something looks wrong, run the printer’s cleaning tool from the menu.
Testing helps you fix small problems early. Many Sydney families trust Prime Geeks for support when test results are not perfect.
Common Setup Problems and Simple Fixes

Sometimes the printer may not connect to Wi-Fi or may show an error light. First, turn the printer off and on again, which often solves small glitches. Check that cables are tight and ink cartridges are seated correctly.
If colors look strange, run a head cleaning or alignment tool. Avoid forcing parts open or closed, as this can break them. Smart troubleshooting keeps Photo printing printers safe and working longer.
Ongoing Care After Installation
Keep the printer covered when not in use to stop dust from entering. Use it at least once a week so ink does not dry inside the nozzles. Store extra paper in a dry place to prevent curling. Update software when the brand releases new versions.
Regular care keeps performance strong and reduces repair costs. Support teams like Prime Geeks focus on guiding users toward long-term printer health, not just quick fixes.
Final Thoughts
Installing a printer is not just plugging in wires; it is about setting up for quality and safety. Careful steps protect your machine and help every photo look its best.
With the right space, correct software, and smart settings, printing becomes simple and fun. This guide shared real-world experience and practical advice to help Sydney users feel confident. If you ever feel unsure, asking trained professionals can save time and money.
Safety Note: Always follow the manufacturer’s manual and use approved cables and ink. If you notice burning smells, smoke, or damaged wires, turn off the printer and seek professional help right away.